Running the Elasticsearch + Logstash + Kibana Stack with Docker Compose
In this article, we’ll launch a stack that makes working with your logs convenient. We’ll need: Elasticsearch—one of the best solutions for full-text search and data filtering, Logstash—a pipeline for collecting, filtering and transforming logs before sending them to Elasticsearch, and Kibana—a web interface for visualizing and reading data from Elasticsearch.
We use this stack to store logs from APIs running on Smappi.
The easiest way to run this whole stack is in containers managed by Docker Compose. The docker-elk project is well suited to this purpose and includes everything we need. Let’s configure and launch it.
Installing Docker Compose and ELK
Besides docker.io and docker-compose, we’ll also need git:sudo apt update sudo apt install docker.io docker-compose git
Now let’s download docker-elk:cd ~ git clone https://github.com/deviantony/docker-elk
I use my own private fork with overridden settings for Elasticsearch and Logstash. I recommend that you also maintain your own fork rather than using the original. This way, you can keep your changes and share them with your team.
Configuring ELK
To be able to work with Docker as your user, you need to add that user to the “docker” group:
sudo usermod -a -G docker <USERNAME>
To avoid losing the data stored in Elasticsearch when the container restarts, I recommend mounting your own volume. To do this, add an entry to volumes in the elasticsearch section of the docker-compose.yml file:
services: elasticsearch: volumes: - ./elasticsearch/config/elasticsearch.yml:/usr/share/elasticsearch/config/elasticsearch.yml:ro - <Абсолютный путь до вашего хранилища>elasticsearch/data:/usr/share/elasticsearch/data:rw
Now, if you restart the container, your Elasticsearch instance will pick up the data automatically.
Starting ELK
Let’s go to the “docker-elk” directory and run the command that will bring up all three services on a shared network:
cd docker-elk docker-compose up
If everything starts without errors, stop the containers with Ctrl+C. Below, we’ll write a service file for systemd so that it automatically starts the containers after a system reboot and monitors their state.
Configuring Nginx
First, let’s create an htpasswd file for HTTP Basic authentication. Specify your USERNAME and enter a password when prompted:
echo "<USERNAME>:`openssl passwd -apr1`" > /etc/nginx/htpasswd
For this example, the Elasticsearch host will be “elastic.example.org”, and the Kibana host will be “kibana.example.org”. Now create the file /etc/nginx/sites-available/elk.conf and put the following contents in it:
server {
    listen 80;
    server_name elastic.example.org kibana.example.org;
    return 301 https://$host$request_uri;
}

server {
    listen 443 ssl;
    ssl_protocols TLSv1 TLSv1.1 TLSv1.2;
    ssl_certificate /etc/nginx/certs/fullchain.pem; # managed by Certbot
    ssl_certificate_key /etc/nginx/certs/privkey.pem; # managed by Certbot
    ssl_session_cache shared:SSL:10m;
    client_max_body_size 20M;
    server_name elastic.example.org;

    satisfy any;
    allow <TRUSTED IP ADDRESS HERE>;  # Укажите IP адрес, которому вы доверяете (например соседний сервер откуда вы отправляете запросы к Elastic)
    allow <LOCAL IP ADDRESS HERE>;  # Если вы на одном сервере запустились, то укажите локальный адрес (127.0.0.1, 192.168.0.1 или какой-либо другой, посмотрите через какой интерфейс осуществяется передача данных)
    # allow 172.17.0.0/24;
    deny all;
    auth_basic "closed site";
    auth_basic_user_file htpasswd;

    location / {
        proxy_pass http://localhost:9200;
    }
}

server {
    listen 443 ssl;
    ssl_protocols TLSv1 TLSv1.1 TLSv1.2;
    ssl_certificate /etc/nginx/certs/fullchain.pem; # managed by Certbot
    ssl_certificate_key /etc/nginx/certs/privkey.pem; # managed by Certbot
    ssl_session_cache shared:SSL:10m;
    client_max_body_size 20M;
    server_name kibana.example.org;
    auth_basic "closed site";
    auth_basic_user_file htpasswd;
    location / {
        proxy_pass http://localhost:5601;
    }
}
To learn how to obtain an SSL/TLS certificate, read my other article, “Getting a Free SSL/TLS Certificate from Let’s Encrypt and Configuring Nginx”.
If, for some reason, you don’t want to use HTTPS, you can use this configuration:
client_max_body_size 20M;
auth_basic "closed site";
auth_basic_user_file htpasswd;

server {
    listen 80;
    server_name elastic.example.org;
    location / {
        proxy_pass http://localhost:9200;
    }
}
server {
    listen 80;
    server_name kibana.example.org;
    location / {
        proxy_pass http://localhost:5601;
    }
}
Let’s create a symlink to enable the configuration and restart Nginx:ln -s /etc/nginx/sites-available/elk.conf /etc/nginx/sites-enabled/elk.conf nginx -s reload
Open kibana.example.org in your browser. You should see an interface roughly like this:
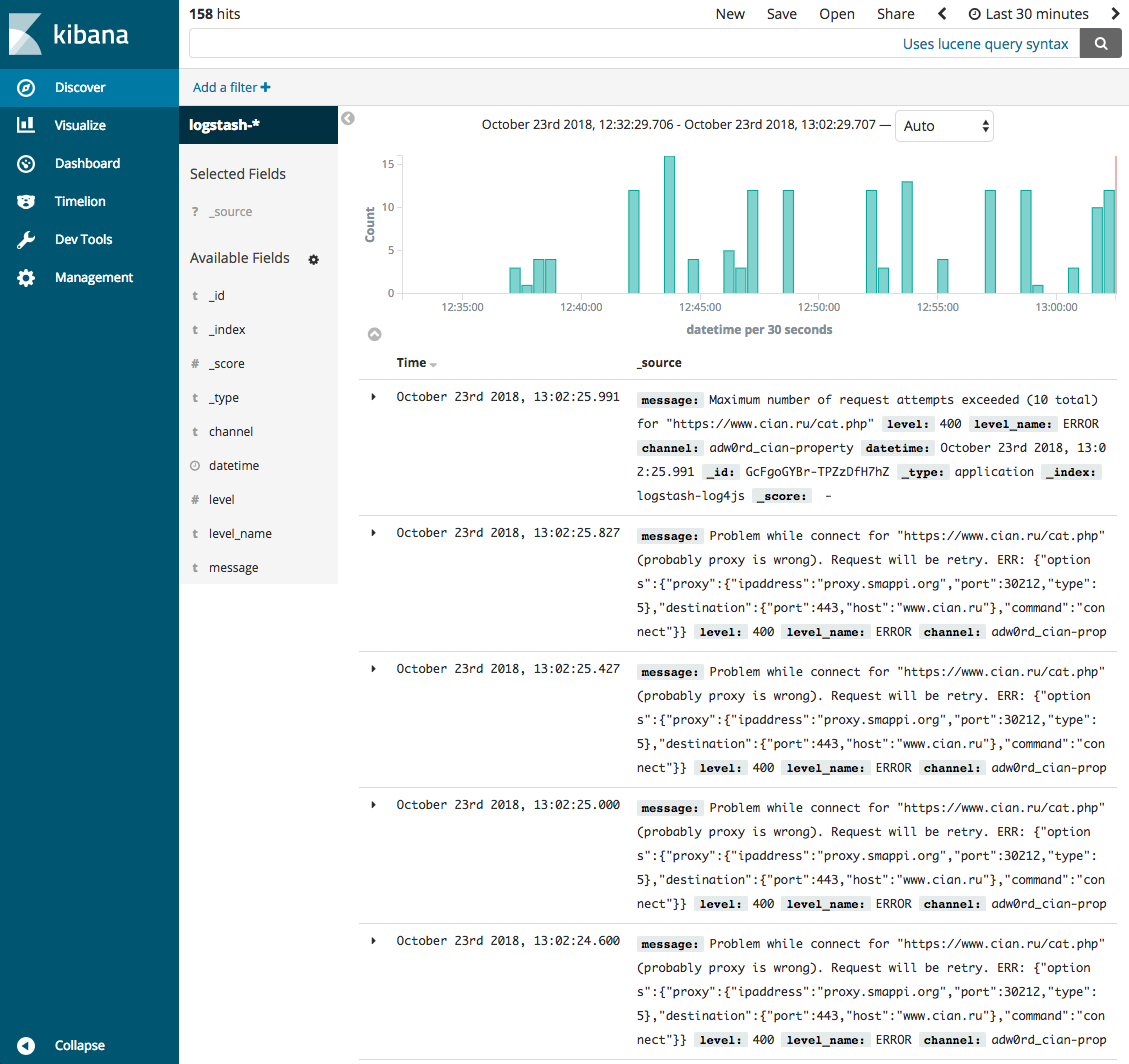
Go to Management > Index Patterns and click the Create Index Pattern button. Enter “logstash-*” in the Index pattern field, and set the Time Filter field name field to “datetime”. This will configure a pattern to match all data from Logstash.
Starting ELK Automatically
Let’s create a service file in the systemd directory:
sudo emacs /etc/systemd/system/docker-compose-elk.service
And add the following contents:
[Unit]
Description=ELK: Docker Compose Application Service
Requires=docker.service
After=docker.service

[Service]
WorkingDirectory=/home/<USERNAME>/docker-elk
ExecStart=/usr/bin/docker-compose up
ExecStop=/usr/bin/docker-compose down
TimeoutStartSec=0
Restart=on-failure

[Install]
WantedBy=multi-user.target
Now let’s enable and start our service:
sudo systemctl enable docker-compose-elk sudo systemctl start docker-compose-elk
You can also check the status, stop, or restart the service:
sudo systemctl status docker-compose-elk sudo systemctl stop docker-compose-elk sudo systemctl restart docker-compose-elk
After changing the service file, reload systemd’s unit definitions:
systemctl daemon-reload
That’s really all you need to know to get ELK up and running initially. You can leave your questions in the comments on this article.
Comments are closed. Read the original discussion in Russian →