FreeBSD. Redirecting outgoing traffic over a VPN with ipfw forward
I needed to redirect outgoing traffic from a server over a VPN, while keeping the server handling all requests on its existing external interface (for example, the web server, ssh, dns, and other services should keep working as if nothing had changed). This can be useful for crawling: if a website (a data source) imposes quotas on request frequency and the like, we simply use a VPN with a Dynamic IP, while our website on the same server continues serving clients.
We have FreeBSD and ipfw, along with an openvpn client and mpd5. Any VPN will actually do (though the examples will be for OpenVPN and PPTP); the main thing is that it brings up an interface in the system that we can allow data to be sent through.
So, we have two interfaces:
- bce0 - gateway
203.0.113.1, ip203.0.113.11, Static IP - tun0 - gateway
10.8.1.1, ip10.8.1.17, Dynamic IP
Here is a diagram illustrating this:
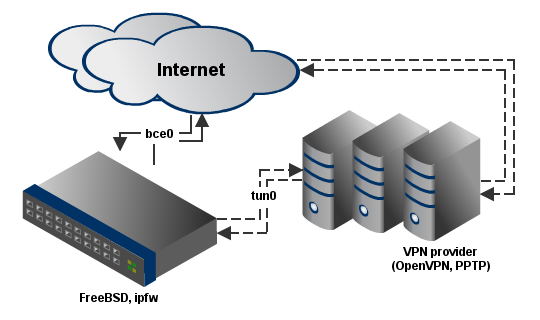
It all looks simple: ipfw has forward, so we just connect to the VPN, bring up the network interface, and send the necessary data through it. That’s it. But the problem is that our VPN has a Dynamic IP, and we cannot hard-code the dynamically assigned IP address in the ipfw configuration, while specifying the tun0 network interface for forward is simply impossible. Of course, we could reinvent the wheel with something that changes the ipfw rules after the interface reconnects, but there must be a simpler solution.
After asking on the Lissyara forum and rethinking the problem, I realized we could do it the other way around: when connecting to the VPN, we need to allow routes to be pulled (i.e., the default gateway will be replaced with the one received from the VPN provider, on the tun0 interface), and create rules for the external bce0 interface. This is the rule I ended up with:
# ipfw add fwd <IPv4-address-from-bce0-gateway> all from <IPv4-address-from-bce0> to any
ipfw add fwd 203.0.113.1 all from 203.0.113.11 to any
Here we redirect all ip packets received from 203.0.113.11 to the gateway 203.0.113.1.
Now let’s look at the current routes before connecting to the VPN:
$ netstat -rn
Routing tables

Internet:
Destination        Gateway            Flags    Refs      Use  Netif
default            203.0.113.1        UGS         0 288182787   bce0
203.0.113.0/26     link#2             U           0 48030001   bce0
203.0.113.11       link#2             UHS         0 1191123263    lo0
127.0.0.1          link#5             UH          0 2765661929    lo0
Connecting to the VPN…
I chose http://vpntunnel.com/ as my OpenVPN provider, but the speed after connecting was disastrous: without the VPN, requests took
0.3-0.5 secon average; after connecting, they took5-20 sec. An example/usr/local/etc/openvpn/vpntunnel.confconfiguration:client dev tun proto udp ca /usr/local/etc/openvpn/vpntunnel_keys/ca1.crt ns-cert-type server cipher BF-CBC resolv-retry infinite auth-user-pass /usr/local/etc/openvpn/vpntunnel_auth.conf ;route-noexec ;route-nopull remote-random remote ru-vpn.vpntunnel.se 7001 remote ru-vpn.vpntunnel.se 7002 remote ru-vpn.vpntunnel.se 7003 remote ru-vpn.vpntunnel.se 7004 remote ru-vpn.vpntunnel.se 7005 remote ru-vpn.vpntunnel.se 7006 remote ru-vpn.vpntunnel.se 7007 remote ru-vpn.vpntunnel.se 7008 remote ru-vpn.vpntunnel.se 7009 persist-key persist-tun nobind comp-lzo log-append /var/log/vpn/vpntunnel.log verb 4 mute 20Let’s add openvpn to
/etc/rc.conf:openvpn_enable="YES" openvpn_if="tun" openvpn_configfile="/usr/local/etc/openvpn/vpntunnel.conf"Start openvpn:
/usr/local/etc/rc.d/openvpn startI chose http://www.hotvpn.com/ as my PPTP provider. Here, requests took no more than
0.5 sec, which was certainly encouraging, but it turned out that the advertised Dynamic IP and OpenVPN support were only available in the Windows client. An example/usr/local/etc/mpd5/mpd.confconfiguration:default: load pptp_client pptp_client: create bundle static B1 set iface route default # set iface up-script /usr/local/etc/mpd5/hotvpn_up.sh # set iface down-script /usr/local/etc/mpd5/hotvpn_down.sh set ipcp ranges 0.0.0.0/0 0.0.0.0/0 set bundle enable compression set ccp yes mppc set mppc yes e40 set mppc yes e128 set mppc yes stateless create link static L1 pptp set link action bundle B1 set auth authname <username> set auth password <password> set link max-redial 0 set link mtu 1460 set link keep-alive 20 75 set pptp peer ru.hotvpn.com set pptp disable windowing openLet’s add mpd5 to
/etc/rc.conf:mpd5_enable="YES"Start mpd5:
/usr/local/etc/rc.d/mpd5 startWith PPTP, the interface brought up will be ng0 rather than tun0, but everything else still applies.
Let’s connect to the VPN and look at the new routes:
$ netstat -rn
Routing tables

Internet:
Destination        Gateway            Flags    Refs      Use  Netif
default            10.8.1.1           UGS         0 33562412    tun0
10.8.1.1           link#7             UH          0        0    tun0
10.8.1.17          link#7             UHS         0        0    lo0
203.0.113.0/26     link#2             U           0   179047   bce0
203.0.113.11       link#2             UHS         0   239069    lo0
127.0.0.1          link#5             UH          0 214629971    lo0
That’s it—the setup described at the beginning of the article should now work. See the output of ipfw show.
Building a kernel with ipfw fwd support
To implement this, we need fwd (forward) support in ipfw. If your kernel was built without IPFIREWALL_FORWARD support, you will have to rebuild it. To do that, we’ll copy the GENERIC kernel configuration and add the necessary options. Go to the FreeBSD source directory:
cd /usr/src
ls
If there is nothing there, you need to download the source code. For FreeBSD 9, it is available here:
svn co http://svn.freebsd.org/base/stable/9 /usr/src
You need to choose the directory corresponding to your processor architecture; in my case, it is amd64:
cd /usr/src/sys/amd64/conf/
Now let’s copy the kernel configuration; for this example, I named it MY_KERNEL:
cp GENERIC MY_KERNEL
Now let’s add IPFIREWALL_FORWARD and some other options to MY_KERNEL:
options         IPFIREWALL
options         IPFIREWALL_VERBOSE
options         IPFIREWALL_VERBOSE_LIMIT=100
options         IPFIREWALL_FORWARD
options         IPDIVERT
For convenience, let’s edit /etc/make.conf:
NO_PROFILE=YES
CFLAGS= -O2 -pipe
KERNCONF=MY_KERNEL
Add the user “auditdistd”; it will be needed during installation. See “/usr/src/UPDATING”:
pw useradd auditdistd -G wheel
Before starting, back up “/etc” just in case:
tar -czf /home/username/etc.tgz /etc
Build world and the kernel:
cd /usr/src
make buildworld
make buildkernel
make installkernel
If you are going to use mergemaster -p, back up “/etc”, since you will have to merge configuration files and it is easy to make a mistake. If you have modified the user password file, run password root before rebooting the OS, or you will not be able to log in.
reboot
You can find instructions for building the kernel here.
Further reading
Comments are closed. Read the original discussion in Russian →