FreeBSD. Installing and Configuring an ejabber 2 Server

I needed to set up secure messaging between users for internal use, so I chose the XMPP protocol and the ejabber 2 server. Since there was an available FreeBSD server, I decided to deploy everything there.
ejabber is written in the wonderful Erlang language, as is its configuration file. However, you do not need to know the language to edit the configuration file; it is quite readable.
The ejabberd server is a leader among Jabber servers. Facebook, Vkontakte, Yandex, Google, and many other companies use it for their services. It is often used to exchange data over XMPP for all sorts of online games, and so on.
For this example, we will use jabber.example.org as the domain for the Jabber server, and conference.jabber.example.org as the domain for conferences. The server’s IP address will be 203.0.113.42.
Installation
Let’s update the ports tree:
cd /usr/ports
portsnap fetch update
And install ejabberd:
cd /usr/ports/net-im/ejabberd
make install clean
echo 'ejabberd_enable="YES"' >> /etc/rc.conf
Generating Keys
We will use SSL to protect the traffic. Let’s create a subdirectory to store the ejabberd keys:
mkdir /usr/local/etc/ejabberd/certs
cd /usr/local/etc/ejabberd/certs

openssl req -new -x509 -nodes -newkey rsa:1024 -days 3650 -keyout privkey.key -out ssl.pem \
-subj "/C=RU/ST=/L=/O=/OU=/CN=jabber.example.org/emailAddress=info@example.org"

cat privkey.key >> ssl.pem
rm privkey.key
chown ejabberd:ejabberd ssl.pem
chmod 600 ssl.pem
Where:
C- Country Name (2 letter code);ST- State or Province Name (full name);L- Locality Name (eg, city);O- Organization Name (eg, company);OU- Organizational Unit Name (eg, section);CN- Common Name (eg, YOUR name). In our case, “jabber.example.org”;emailAddress- Email Address. In our case, “info@example.org”.
Now let’s move on to configuration.
Configuration
Go to the configuration directory /usr/local/etc/ejabberd and copy the examples to actual configuration files:
cd /usr/local/etc/ejabberd
cp inetrc.example inetrc
cp ejabberdctl.cfg.example ejabberdctl.cfg
cp ejabberd.cfg.example ejabberd.cfg
Then edit the file ejabberd.cfg (lines beginning with the “%” character are comments):
%% Ищем {hosts, ["localhost"]}... заменяем на наш домен:
{hosts, ["jabber.example.org"]}.

%% Ищем {listen, [{5222, ejabberd_c2s}... и добавляем путь до сгенерированного ранее файла сертификата:
{certfile, "/usr/local/etc/ejabberd/certs/ssl.pem"}, starttls,

%% Далее ищем "{acl, admin, {user, "ermine", "example.org"}}." и указываем пользователя как админа:
{acl, admin, {user, "adw0rd", "jabber.example.org"}}.

%% Можете сменить "{access, max_user_sessions, [{10, all}]}.", для увеличения
%% количества одновременных пользовательских сессий (но это не обязательно):
{access, max_user_sessions, [{100, all}]}.

%% Для увеличения максимального количества офлайн сообщений, надо изменить
%% "{access, max_user_offline_messages, [{5000, admin}, {100, all}]}." на (это тоже не обязательно):
{access, max_user_offline_messages, [{5000, admin}, {1000, all}]}.
We will add some more MUC settings to the file below, so do not start the server yet.
Creating Conferences (Also Known as Chats)
This is handled by the MUC (Multi-users conference) protocol, which lets you create rooms for group conversations between users. In ejabberd, this is handled by the muc_module module, along with all the other modules with the “muc_” prefix.
One problem you may encounter is the limit on the number of messages stored while a user is offline. By default, this is 20 messages; that is, if more than 20 messages were posted in the chat while you were away, you will only receive the last 20. You can specify a different value by changing the history_size option. The end result will look like this:
  {mod_muc,      [
              {host, "conference.@HOST@"},
              {access, muc},
              {access_create, muc_create},
              {access_persistent, muc_create},
              {access_admin, muc_admin},
              {history_size, 1000}
             ]},
We also uncommented the line {host, "conference.@HOST@"}, which registers the domain name for conferences, so in our case it will be “conference.jabber.example.org”.
Configuring DNS for the example.org Domain
You need to add the following A and SRV records. Bind9 is used as the example DNS server, but you can use any other server compatible with its configuration file:
jabber                  A       203.0.113.42
conference.jabber       A       203.0.113.42
_xmpp-server._tcp.jabber.example.org. IN SRV 0 0 5269 jabber.example.org.
_jabber._tcp.jabber.example.org.      IN SRV 0 0 5269 jabber.example.org.
_xmpp-client._tcp.jabber.example.org. IN SRV 0 0 5222 jabber.example.org.
Apply the settings:
named-checkconf
rndc reload
Then you can check the records using the dig utility, for example:
dig -t srv _xmpp-server._tcp.jabber.example.org
The result should contain an ANSWER section with the following contents:
;; ANSWER SECTION:
_xmpp-server._tcp.jabber.example.org. 3600 IN SRV 0 0 5269 jabber.example.org.
Starting the Server
Start ejabberd:
/usr/local/etc/rc.d/ejabberd start
If it fails to start, you may have a problem with .erlang.cookie. Set the appropriate permissions on the file /var/spool/ejabberd/.erlang.cookie (this file should be stored in the home directory; you can find the home directory like this: pw usershow ejabberd). Set the permissions:
chown ejabberd:ejabberd /var/spool/ejabberd/.erlang.cookie
chmod 400 /var/spool/ejabberd/.erlang.cookie
If the server just will not start (this happened to me once), I simply rebooted the box, and everything came up on its own after the reboot.
Administrative Web Interface and Adding Users
After ejabberd starts, TCP port 5280 will become available, with the ejabberd web server listening on it. Open it:
http://jabber.example.org:5280/admin/
You can also create an Nginx configuration and proxy requests to port 5280, adding SSL support:
server {
    ssl_protocols SSLv3 TLSv1;
    ssl_certificate /path/to/certs/jabber.pem;
    ssl_certificate_key /path/to/certs/jabber.key;

    listen 443 ssl;
    server_name jabber.example.org;

    location / {
        proxy_pass http://localhost:5280;
        proxy_set_header Host $host;
        proxy_set_header X-Real-IP $remote_addr;
        proxy_set_header X-Forwarded-For $proxy_add_x_forwarded_for;
    }
}
Don’t forget to generate a certificate for the web interface:
cd /path/to/certs/
openssl req -new -x509 -nodes -newkey rsa:1024 -days 3650 -keyout jabber.key -out jabber.pem \
-subj "/C=RU/ST=/L=/O=/OU=/CN=jabber.example.org/emailAddress=info@example.org"
Users can be added from the console using ejabberdctl. You will have to add the first user (the one we specified as the administrator in the configuration file) this way, because you need to authenticate in the web interface, and you cannot do that without an account:
ejabberdctl register adw0rd jabber.example.org <PASSWORD>
After that, you can add users directly in the web interface at http://jabber.example.org:5280/admin/server/jabber.example.org/users/.
Voice and Video Communication
The ejabberd server does not provide these services directly. They are implemented through the Jingle protocol and specific client-side implementations. Data is exchanged on a P2P basis, so users behind NAT may encounter problems. A STUN server should be used for this purpose.
I have not configured Jingle, but if I ever do, I will be sure to write about it. In the meantime, see:
Configuring the Client
Let’s use Pidgin as an example, since it is easy to configure and available on many platforms. Install this client, then click Accounts -> Manage Accounts -> Add.... Fill out the Add Account form roughly as follows:
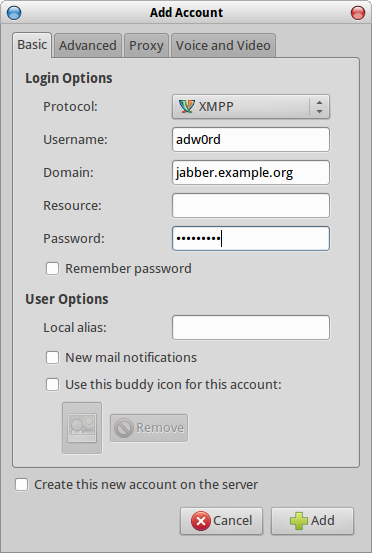
Then try connecting. Everything should work!
What Else Can I Read?
Comments are closed. Read the original discussion in Russian →