Debian. Setting up our own OpenVPN server, forwarding, and client

I needed to set up an OpenVPN server so I could access the internet through it and make servers on the internal network accessible. The result can be illustrated like this:
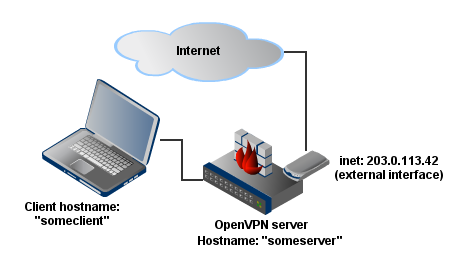
These instructions are for Debian, but I don’t think things will be very different on FreeBSD.
Installing and configuring the server
Log into the server and install OpenVPN:
apt-get install openvpn
Create the file /etc/openvpn/server.conf with the following contents:
mode server
daemon vpn-server
#local 203.0.113.42
port 1194
proto udp
dev tun
ca ca.crt
cert server.crt
key server.key
dh dh2048.pem  # либо dh1024.pem, в зависимости от размера ключа
tls-server
tls-auth ta.key 0
cipher DES-EDE3-CBC
server 192.168.50.0 255.255.255.0
push "redirect-gateway"
ifconfig-pool-persist ipp.txt
keepalive 10 120
comp-lzo
user nobody
group nogroup
persist-key
persist-tun
status /var/log/openvpn/openvpn-status.log
log-append /var/log/openvpn/openvpn.log
verb 4
mute 20
client-to-client
client-config-dir ccd
route 192.168.50.0 255.255.255.0
Now I’ll explain the parameters:
mode server- means that OpenVPN will run in server mode;daemon- specifies that it will run as a daemon, with stderr/stdout sent to syslog;local 203.0.113.42- you can specify a particular IP address to listen on (for example, if you have several external network interfaces);port 1194- the port to listen on;proto udp- we’ll use UDP, since it uses less traffic; you can also specify “tcp”;dev tun- use a managed IP tunnel; you can also use “tap” (an Ethernet tunnel);ca ca.crt- path to the root certificate file we generated;cert server.crt- path to the server certificate file we generated;key server.key- path to the server private key file we generated;dh dh2048.pem- path to the file containing the Diffie Hellman parameters we generated (used only for connections through a TLS server);tls-server- enable TLS and identify ourselves as a server during the handshake;tls-auth ta.key 0- provide a TLS key as an additional layer of protection. The “0” option (directionality) specifies the direction; on the other side (the client), you need to specify the other direction, “1”;cipher DES-EDE3-CBC- the type of packet encryption to use;server 192.168.50.0 255.255.255.0- allocate IP addresses in the range “192.168.50.1-192.168.50.255”, with the server itself taking “192.168.50.1” and the rest going to clients;push "redirect-gateway"- after successfully connecting to the server, the client will be assigned a new default gateway by the VPN server (seenetstat -rafter connecting), so all traffic will go through the VPN server;ifconfig-pool-persist ipp.txt- a file that stores “client profile, assigned IP address” mappings, so the same address will be assigned again after reconnecting;keepalive 10 120- set the number of seconds for ping and ping-restart, respectively (needed to keep connections to the VPN server alive);comp-lzo- enable LZO traffic compression;user nobody- lower the VPN server’s user privileges;group nogroup- lower the VPN server’s user privileges;persist-key- do not reread certificates when a SIGUSR1 signal is received or ping-restart is triggered, since the server will not have sufficient privileges for these operations (see the previous item, “nobody:nogroup”);persist-tun- do not recreate tun/tap devices when a SIGUSR1 signal is received or ping-restart is triggered;status /var/log/openvpn/openvpn-status.log- path to the status log;log-append /var/log/openvpn/openvpn.log- path to the VPN server log;verb 4- log verbosity level, from 0 to 11, in increasing order of detail:0 - fatal errors only;
1 - startup information, connection information, network errors;
2,3 - TLS data and routing information;
4 - shows parameters;
5 - shows ‘RrWw’ characters in the console for each packet sent and received over TCP/UDP (uppercase) or tun/tab (lowercase);
6-11 - debugging information with increasing log detail;
mute 20- limit the number of log messages of the same type;client-to-client- allow clients to see each other on the network;client-config-dir ccd- a directory with custom client settings (create a file named “ccd/” to specify custom settings for the someclient profile);route 192.168.50.0 255.255.255.0- add routes to the server’s routing table; for clients, you need to useiroute 192.168.50.0 255.255.255.0or push routes:push "route 192.168.50.0 255.255.255.0"
To understand the parameters, I read OpenVPN: Server configuration file and man openvpn.
Create a directory for logs:
mkdir /var/log/openvpn/
Next, find the “easy-rsa” directory:
find /usr -type d -name "easy-rsa"
In newer versions, easy-rsa needs to be installed separately:
apt-get install easy-rsa, after which you need to change to the “/usr/share/easy-rsa/” directory.
Now we need to create SSL certificates and keys. To do this, change to the easy-rsa directory, activate the vars environment, and run the necessary commands:
In newer versions, such as
Easy-RSA 3, the way keys are created has changed; see this article for details.
# Переходим в каталог "easy-rsa", который мы нашли ранее
# cd /usr/share/doc/openvpn/examples/easy-rsa/2.0/
cd /usr/share/easy-rsa/

# Сделаем симлинк на настройки openssl (если будет другая версия, то сами укажите какая нужна вместо "openssl-1.0.0.cnf")
ln -s openssl-1.0.0.cnf openssl.cnf

# Активация окружения
source vars

# Создаем сертификат
./build-ca

# Создаем ключ сервера
./build-key-server server

# Создаем ключ Диффи Хельман
./build-dh

# Генерируем tls-auth ключ
openvpn --genkey --secret keys/ta.key
You can edit the
varsfile beforehand, specifying the necessary settings, such as “country code”, “city”, “organization name”, “email”, and so on, so you don’t have to enter them each time you generate a certificate.
Next, copy the generated keys to /etc/openvpn:
cp keys/{ca.crt,server.crt,dh2048.pem,server.key,ta.key} /etc/openvpn
Start OpenVPN:
/etc/init.d/openvpn start
Giving our clients internet access
Now we need to configure the server to provide internet access to clients connected through OpenVPN. Let’s assume the external interface’s IP address is “203.0.113.42” (you can find yours in ifconfig), and since we’re using Debian, we’ll create rules in iptables:
iptables -A FORWARD -s 192.168.50.0/24 -j ACCEPT
iptables -A FORWARD -d 192.168.50.0/24 -m state --state ESTABLISHED,RELATED -j ACCEPT
iptables -t nat -A POSTROUTING -s 192.168.50.0/24 -j SNAT --to-source 203.0.113.42
If this is your first time using iptables, create the file “/etc/iptables.rules” and save the instructions above to it:
iptables-save > /etc/iptables.rulesThen add this to startup:
echo "pre-up iptables-restore < /etc/iptables.rules" >> /etc/network/interfacesYour rules in
/etc/iptables.ruleswill then be activated when the OS boots.To be more precise, you need to add
pre-upto your interface’s section, but since the relevant interface is usually defined at the end of the file, the recommendation above will be correct. A detailed example:auto eth0 iface eth0 inet static hwaddress aa:bb:cc:dd:ee:ff address 203.0.113.42 netmask 255.255.240.0 gateway 203.0.113.1 pre-up iptables-restore < /etc/iptables.rules
Enable forwarding in the kernel by uncommenting the following line in /etc/sysctl.conf:
net.ipv4.ip_forward=1
To avoid rebooting, tell the kernel to enable forwarding:
echo 1 > /proc/sys/net/ipv4/conf/all/forwarding
Everything is configured on the server side; now we’ll configure the client, and we’ll be ready to use it!
Generating keys for the client
These steps are performed on the server! Now we need to generate certificates for each client that will need access to connect to the OpenVPN server:
# cd /usr/share/doc/openvpn/examples/easy-rsa/2.0/
cd /usr/share/easy-rsa/

# Активация окружения
source vars

# Создаем ключ для пользователя
./build-key someclient
# Либо с дополнительной защитой по паролю
#./build-key-pass someclient

# Создаем архив с ключами для клиента (ниже мы его будем скачивать)
cd keys
tar -czf /home/<username>/openvpn_keys.tgz someclient.* ca.crt ta.key
If you need to add another user, do the same thing, just change “someclient” to something else.
Usage
Switch to the client computer (in my case, Xubuntu) and copy the keys from the server:
mkdir /etc/openvpn/someserver
cd /etc/openvpn/someserver
scp username@someserver:openvpn_keys.tgz .
tar -xzf openvpn_keys.tgz
rm openvpn_keys.tgz
Create the file /etc/openvpn/someserver.conf:
client
remote 203.0.113.42
redirect-gateway def1
port 1194
dev tun
proto udp
resolv-retry infinite
nobind
pull
user nobody
group nogroup
persist-key
persist-tun
ca /etc/openvpn/someserver/ca.crt
cert /etc/openvpn/someserver/someclient.crt
key /etc/openvpn/someserver/someclient.key
tls-client
tls-auth /etc/openvpn/someserver/ta.key 1
cipher DES-EDE3-CBC
comp-lzo
mute 20
verb 3
log openvpn.log
Now I’ll explain the parameters:
client- state that we are connecting as a client;remote 203.0.113.42- specify the VPN server’s address;redirect-gateway def1- a mode that allows the default gateway to be changed and restores your ISP’s gateway after the VPN connection is stopped;port 1194- specify the VPN server’s port;dev tun- specify the same device as on the VPN server;proto udp- use UDP, since the VPN server also uses UDP;resolv-retry infinite- keep resolving the VPN server indefinitely; useful after losing the connection and reconnecting (for example, after suspending a laptop);nobind- do not create a fixed port for the client connection;pull- allow the client to receive push instructions from the VPN server and apply them locally (for example, changes to the routing table);user nobody- lower user privileges;group nogroup- lower user privileges;persist-key- do not reread certificates when a SIGUSR1 signal is received or ping-restart is triggered, since the client will not have sufficient privileges for these operations (see the previous item, “nobody:nogroup”);persist-tun- do not recreate tun/tap devices when a SIGUSR1 signal is received or ping-restart is triggered;ca /etc/openvpn/someserver/ca.crt- path to the root certificate file we generated;cert /etc/openvpn/someserver/someclient.crt- path to the client certificate file we generated;key /etc/openvpn/someserver/someclient.key- path to the client private key file we generated;tls-client- enable TLS and identify ourselves as a client during the handshake;tls-auth /etc/openvpn/someserver/ta.key 1- provide a TLS key as an additional layer of protection;cipher DES-EDE3-CBC- the type of packet encryption to use (must match the server’s);comp-lzo- enable LZO traffic compression;verb 3- log verbosity level, from 0 to 11. I described this in more detail in the corresponding section of the server configuration;mute 20- limit the number of log messages of the same type;log openvpn.log- path to the client log.
To understand the parameters, I read OpenVPN: Client configuration file and man openvpn.
Starting up
You can start all connections specified in AUTOSTART (see /etc/default/openvpn):
service openvpn start
Or start a specific connection like this:
sudo openvpn /etc/openvpn/someserver.conf
# Или так
sudo service openvpn start someserver
You can check the connection like this:
$ sudo route -n | grep "tun0"
If we see connections with the “tun0” interface, everything is fine.
Let’s check whether internet access works through our OpenVPN server. To do this, visit http://www.geoiptool.com/ and check: is that where your server is geographically located? If so, everything is okay; otherwise, check the client logs at /etc/openvpn/openvpn.log and leave a comment.
Disabling automatic connection startup on the client
I use Xubuntu, and I disable autostart for all OpenVPN profiles like this:
emacs /etc/default/openvpn
Find AUTOSTART="none" and uncomment it. There will also be examples of how to specify the profile you want; for instance, you can specify the AUTOSTART="someserver" profile we created.
If your client is FreeBSD, you need to add the following to /etc/rc.conf:
openvpn_enable="YES"
openvpn_if="tun"
openvpn_configfile="/etc/openvpn/someserver.conf"
What else is there to read?
- Notes in the Home Directory - An OpenVPN server for internet access
- Installing and configuring OpenVPN on Ubuntu Server
- Ubuntu OpenVPN Server (Configuration, connecting branch office networks)
- OpenVPN - Russian-language Ubuntu documentation
- HOWTO: Sample OpenVPN 2.0 configuration files
- OpenVPN: creating a full-fledged OpenVPN gateway
- Generating certificates for OpenVPN using Easy-RSA 3
Comments are closed. Read the original discussion in Russian →