Building Your Own Video Service and Setting Up Pseudostreaming

Today I’ll explain how “video hosting sites” work, and we’ll develop our own “video service” for uploading video files, then converting them and creating preview images. Next, we’ll set up playback in a Flash player and emulate streaming (so we can seek to parts of the video file that haven’t loaded yet).
For all this, we’ll need:
- A Flash player for playing video files — flowplayer
- A program for converting video files — ffmpeg
- A PHP extension for obtaining a preview image — php-ffmpeg, and a graphics library — GD
- Emulated video streaming (pseudostreaming) using the yamdi utility, the http_flv_module module for nginx, and the flowplayer.pseudostreamming plugin for flowplayer
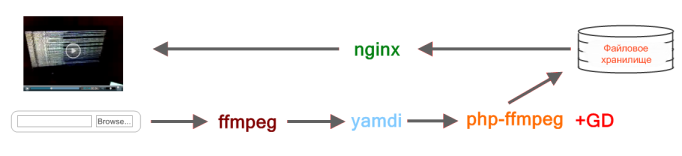
As usual, the server OS is FreeBSD.
Installing the Utilities We Need
ffmpeg
To convert video, we need to install the ffmpeg utility. There’s also a similar utility, mencoder, which is very good too, but ffmpeg is more popular, so that’s what I’ll use here. These utilities compete with each other with varying degrees of success, so I also recommend taking a look at mencoder in your spare time.
# cd /usr/ports/multimedia/ffmpeg
# make config
Then select LAME (lame MP3 codec).
# make install
Windows builds of ffmpeg: http://ffmpeg.arrozcru.org/builds/
yamdi
Next, we need to install the yamdi utility, which embeds metadata in a video file. Metadata is needed to index the file, so that when seeking through a file that hasn’t been downloaded (buffered) yet, we can move between indexed positions.
# cd /usr/ports/multimedia/yamdi
# make install
nginx
Now it’s time for nginx, which will serve the video file indexed using yamdi. We could use lighttpd or some other web server instead. But I’ll support a homegrown product! :)
# cd /usr/ports/www/nginx
# make config
Select HTTP_FLV_MODULE, then:
# make install
Or just specify the “–with-http_flv_module” option during installation.
nginx-0.7.52. Now available for Windows too: http://rmcreative.ru/blog/post/nginx-0.7.52-teper-i-pod-windows
Of course, you can use PHP as the backend, for example with code like this:
$start = (int) @$_GET['position'];
if ($start < 0) die("You fucking idiot");
// open file for reading
$fp = fopen($file, 'r+');
$fsize = filesize($file);
if ($start > 0)
{
    // seek to requested position
    fseek($fp, $start);
    // FLV header for the movie part. Magic. Just trust me.
    // Header code is completely taken from flv4php project
    $header = "FLV" . pack('C', 1 ) . pack('C', 5 ) . pack('N', 9 ) . pack('N', 9 );
    header("Content-Length: " . (strlen($header) + $fsize - $start));
    echo $header;
} else {
    header("Content-Length: " . $fsize);
}
set_time_limit(0);
while(!feof($fp)) {
    print(fread($fp, 1024));
    usleep(1000);// limit download speed
}
fclose($fp);
But I find it more convenient to use the nginx module for this, and it’ll be faster too.
php5-ffmpeg
We’ll need this PHP extension to get information about a video file, as well as to retrieve a video frame for the preview. You’ll also need to install the GD library and PHP itself.
# cd /usr/ports/graphics/php5-ffmpeg
# make install
php5-ffmpeg for Windows: http://pyha.ru/forum/attachment/1256/1317.0 and http://pyha.ru/forum/attachment/1257/1317.0
Of course, you can get the information by calling
# ffmpeg -i /path/filename.flvand create a preview
# ffmpeg -i /path/filename.flv -an -ss ВРЕМЯ_ПОЗИЦИИ_В_СЕКУНДАХ -r 1 -vframes 1 -s 320x240 -y -f mjpeg /path/filename.jpgBut I like using the extension; it’s more convenient.
And restart apache or nginx, depending on how you’re using PHP.
Converting Video and Obtaining a Preview Image
First, we need to specify the paths to the source and output files, set the paths to the preview files, and specify the minimum frame position for creating a preview.
// Путь до залитого видео-файла, например временный файл полученный по $_FILES['tmp_file']
$inputPath = $_FILES['tmp_file'];

//Путь до результирующего файла, то есть отконвертированный и прошитый мета-данными видео-файл
$outputPath = "/path/video/filename.flv";

// Указываем минимальную позицию фрейма для захвата превью
$previewFrameMin = '3';

// Путь до превью-файла
$previewPath = "/path/preview/filename.jpg";

// Путь до мини-превью
$previewMiniPath = "/path/preview/filename_mini.jpg";

// Массив для сбора ошибок
$errorInfo = array();
We convert the source file to a temporary file in FLV format at a resolution of 320x240, using mp3lame as the audio codec with a sample rate of 44100, leaving the other settings at their defaults. We need the temporary file so that yamdi can embed the metadata, since it can’t embed it in the source file.
/*
 * Конвертируем FLV во временный файл ($outputPath . '_temp').
 */
passthru(
    '/usr/local/bin/ffmpeg -i ' . escapeshellarg($inputPath) .
        ' -f flv '.
        ' -s 320x240 '.
        ' -acodec libmp3lame '.
        ' -ar 44100 '.
        escapeshellarg($outputPath . '_temp'),
    $errorInfo['ffmpeg']
);
We embed metadata in the video file for indexing. The yamdi utility is written in C and works very fast! We also delete the temporary file.
/*
 * Прошиваем metadata (позиции ключевых фреймов) для перемотки
 */
passthru(
    '/usr/local/bin/yamdi -i ' . escapeshellarg($outputPath . '_temp') .
        ' -o ' . escapeshellarg($outputPath),
    $errorInfo['yamdi']);

/*
 * Удаление временного файла, он нам уже не нужен...
 */
unlink($outputPath . '_temp');
Now we get information about the video file and obtain a frame object for the preview.
/*
 * С помощью расширения php5-ffmpeg получаем информацию о видео-файле
 */
$movie = new ffmpeg_movie($outputPath);

/*
 * Вычисляем время воспроизведения видеофайла
 */
$duration = $movie->getDuration();

/*
 * Вычисляем количество кадров
 */
$frameCount = $movie->getFrameCount();

/*
 * Вычисляем позицию фрейма для его захвата
 */
$framePosition = ($frameCount > $previewFrameMin) ? $frameCount / 2 : $previewFrameMin;

/*
 * Получаем объект фрейма для превью
 */
$preview = $movie->getFrame($framePosition);
And now let’s obtain and save our previews.
/*
 * Записываем в файл - Превью (320x240)
 */
imagejpeg ($preview->toGDImage(), $previewPath);

/*
 * Записываем в файл - Мини-превью (160x120)
 */

$previewMini = imagecreatetruecolor(160, 120);

$r = imagecopyresized(
    $previewMini,
    $preview->toGDImage(),
    0, 0, 0, 0,
    160, 120,
    320, 240
);

imagejpeg($previewMini, $previewMiniPath);
That’s it: the file has been converted to FLV and has metadata embedded in it, and the previews have been created too. Now let’s work on displaying the video file to the client.
The Player and Video Playback
Why flowplayer?
First, we’ll need a Flash player that can play videos in FLV format and display images in JPEG format (for the preview).
Of all the alternatives (see “Useful Links -> Video Players” below), I liked flowplayer best. It:
- Works across browsers, is very flexible, and is easy to configure
- Is free for noncommercial use, and the commercial version’s features are worth the price!
- Has Flash and Javascript APIs and also supports the JQuery library (there are some extra features there)
- Has loads of useful plugins
- Supports streaming and pseudostreaming
- Makes it easy to change appearance and language templates to set up a localized interface
- Has extensive documentation and a fairly large community on its own forum, and also offers free support for the commercial version
- Supports playlists and has a full-screen mode
- Supports these formats: FLV, SWF, MP3, MP4, H.264 video, JPG, PNG
- Has open source code!
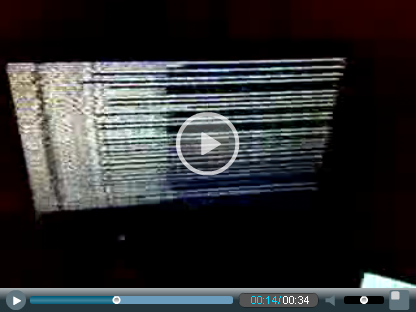
The rest of the feature descriptions are on the official website: http://flowplayer.org/
Configuring flowplayer
We’ve chosen our player; now we need to configure it to display video. The player distribution includes:
- flowplayer-3.1.1.swf — the player itself
- flowplayer.controls-3.1.1.swf — flash-controls
- flowplayer-3.1.1.min.js — the so-called js-api
To implement pseudostreaming, we’re missing flowplayer.pseudostreaming-3.1.2.swf, which you can download and learn how to use here: http://flowplayer.org/plugins/streaming/pseudostreaming.html.
There’s a tutorial on working with all types of streaming: http://flowplayer.org/documentation/configuration/streaming.html
So, let’s get started:
<!-- Подключаем js-api -->
<script type="text/javascript" src="/swf/flowplayer-3.1.1.min.js"></script>

<!-- Настраиваем плеер -->
<script type="text/javascript">
    flowplayer(
        "player",
        "/swf/flowplayer-3.1.1.swf",
        {
            playlist: [
                {
                    url: 'http://example.com/preview/filename.jpg'
                },
                {
                    url: 'http://example.com/video/filename.flv',
                    autoPlay: false,
                    autoBuffering: false,
                    provider: 'pseudo'
                }
            ],
            plugins: {
                pseudo: {
                    url: '/swf/flowplayer.pseudostreaming-3.1.2.swf'
                }
            }
        }
    );
</script>

<!-- DIV в который мы поместим плеер -->
<div style="width:416px;height:312px;display:block;padding:10px;" id="player"></div>
You can look up all the options specified in the settings here: http://flowplayer.org/documentation/configuration/clips.html
Configuring http_flv_module
Now let’s configure nginx to serve the file starting at an offset, to emulate streaming.
        location ~ \.flv$ {
                flv;
                root /path/video;
        }
In other words, we tell nginx to use http_flv_module for the “flv” extension, and specify the path to the video files in root. Documentation for http_flv_module: ngx_http_flv_module Directives
That’s all there is to it; now you have a full-fledged “video service”!
Useful Links
ffmpeg
Working with Video in PHP Using php ffmpeg
An Advanced Method for Playing Flash Video on Web Pages (or Emulating Video Streaming)
Adding a Watermark to Video Using ffmpeg
How Do Video Hosting Sites Work? Part One. Building.
How Do Video Hosting Sites Work? Part Two. Ffmpeg.
Video Players
A Selection of Flash Video Players
Video and Audio Players for Websites
The Perfect Video Player
The Perfect Video Player. Not a Utopia
Comments are closed. Read the original discussion in Russian →